Configuring Static IP for an iNode Uplink Interface
- 05 Sep 2024
- 2 Minutes to read
- Print
- DarkLight
Configuring Static IP for an iNode Uplink Interface
- Updated on 05 Sep 2024
- 2 Minutes to read
- Print
- DarkLight
Article summary
Did you find this summary helpful?
Thank you for your feedback
By default, the iNode uplink Ethernet interface uses DHCP. This article explains how to configure static IP using either the iNode CLI or the web UI.
Configure a Static IP with the CLI
To configure a static IP address for an iNode Ethernet uplink interface, follow these steps:
- Use SSH to connect to the iNode. (Learn how in Accessing an Edge iNode Console Using the Command-Line Interface.)
- Use the set wan command with the following steps to configure a static IP address for the iNode network 1 Ethernet interface.
- Use the set wan command to enter the wan command prompt:Shell
> set wan (set wan) > - Use the ip command with the following arguments to configure a static IP address for the iNode network 1 Ethernet interface.Shell
For example:ip --addr <IP-ADDR> --netmask <NETMASK> --gateway <GATEWAY>
(set wan) > ip --addr 192.170.0.118 --netmask 255.255.255.0 --gateway 192.170.0.1 - Use the save command to save the above config:Shell
(set wan) > save - Use the exitcommand to exit the wan command:Shell
(set wan) > exit
>
Configure a name server
- To configure a name server, use the set name-server command with the following steps. Note that in the example, 8.8.8.8 is a publicly accessible name server. You can use any accessible name server.
- Use the set name-server command to enter the name-server command prompt:Shell
> set name-server (set name-server) > - Use the server command with the following arguments to configure the name server:Shell
server --addr <addr> - For example:Shell
(set name-server) > server --addr 8.8.8.8 - You can also configure two name servers.Shell
(set name-server) > server --addr 8.8.8.8 --addr 208.67.222.222 - Use the save command to save the configuration:Shell
(set name-server) > save - To see the configured name servers, use the showcommand:Shell
(set name-server) > show | ADDRESS ----------------+----------------- Configured | 8.8.8.8 | 208.67.222.222 - Use the exit command to exit the set name-servercommand:Shell
(set name-server) > exit > - Try the pingcommand to verify the static IP configuration.Shell
>ping iotium.io
PING iotium.io (107.180.24.254) 56(84) bytes of data.
64 bytes from iotium.io (107.180.24.254): icmp_seq=1 ttl=57 time=6.55 ms
Set dynamic host addressing (DHCP)
If you want to re-configure the uplink to use dynamic host configuration (DHCP), use the unset wan command as follows:
- Use the unset wancommand to enter the "wan" command prompt:Shell
> unset wan (unset wan) > - Use the ipcommand as follows:Shell
(unset wan) > ip - Use the savecommand to save the configuration:Shell
(unset wan) > save - Use the exit command to exit the wan command:Shell
(unset wan) > exit
>
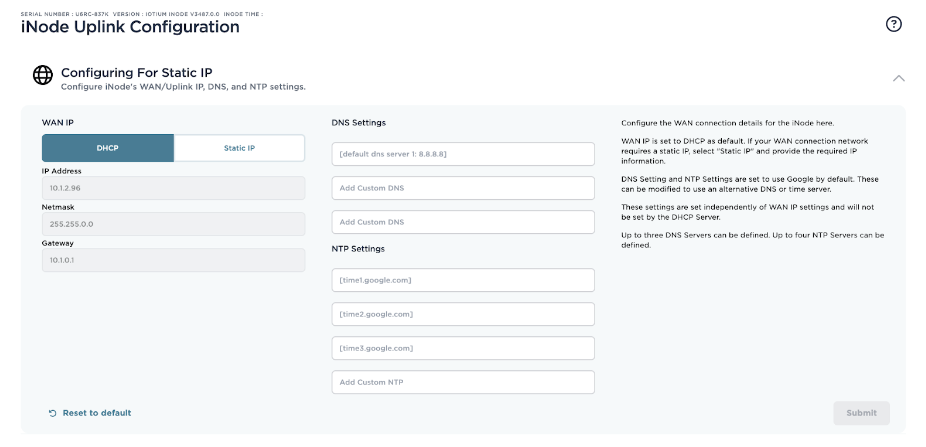
Configure a Static IP with the web UI
To configure the Static IP for the iNode uplink interface using the web UI, follow these steps:
- Expand the Configuring For Static IP section.

- Under the WAN IP heading, select Static IP.
- Enter the appropriate details for IP address, netmask, and gateway.
- If you wish to change the DNS server settings for the iNode, enter those details in the DNS Settings section. You can define up to three DNS servers.
- Select Submit.
Was this article helpful?


