- 10 Jun 2024
- 7 Minutes to read
- Print
- DarkLight
Connecting Networks
- Updated on 10 Jun 2024
- 7 Minutes to read
- Print
- DarkLight
To establish secure data connectivity between iNodes, you need to connect the network behind an Edge iNode to one behind a Virtual iNode.
Depending on your needs, you could:
- Connect one Edge iNode network to one Virtual iNode network
- Connect many Edge iNode networks to one Virtual iNode network
- Connect one Edge iNode network to many Virtual iNode networks
- Connect one Edge iNode network to other networks on the same Edge iNode (Inter Network Routing)
- Create static routes for an Edge iNode or a Virtual iNode
The following sections explain how to create the network connections needed for each of these scenarios.
Connect One Edge iNode Network to One Virtual iNode Network
To connect one Edge iNode network to one Virtual iNode network, follow these steps:
- From the iNodes > All iNodes page, select the name of the Edge iNode to display its iNode details page.

- In the Networks tab, select the name of your local network to display the Edit Network page.

- To add a new row to the table, in the Remote Networks expansion panel, select Add. Under Remote Network, select the remote network to connect to by selecting your organization, remote iNode, and then the network behind the iNode.

- If the Edge iNode network to be connected to the Virtual iNode network will have the same or an overlapping local network CIDR, you’ll need to add a representational network for the Virtual iNode to tell them apart. To do this, under Represent Remote Network Locally as, you need to specify a representational network CIDR to connect to the Virtual iNode. If there is no overlapping CIDR, don’t use the field Represent Remote Network Locally as.

- Any traffic from the local network with a destination outside the local or remote network (for example, traffic going to the internet or LAN) is sent to the default destination. You can set the Default Destination to one of the following:
- None (default), which results in dropping the traffic
- Specify IP Address, which sends the traffic to the IP address of a gateway in the local network that you specify
- WAN Network, which sends the traffic through the iNode uplink
- Select a specific remote network, which sends the traffic to that remote network
- If you want to create static routes for traffic from the local network, see Create static routes for an Edge iNode or a Virtual Edge iNode.
- Select Update to complete the connection between the networks. After the networks have been successfully connected, the iNode details page shows information about the connected network, including the name, representational network CIDR (if specified), and connection status.

Connect Many Edge iNode Networks to One Virtual iNode Network
To connect many Edge iNode networks to one Virtual iNode network, follow these steps:
- From iNodes > All iNodes page, select the name of the Virtual iNode to display the iNode details page.

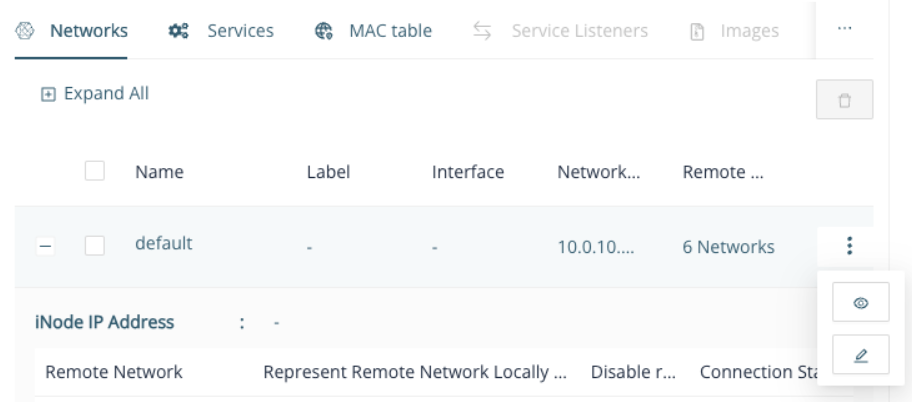
- In the Networks tab, select the Edit icon (three-vertical-dot > pencil icon) in the default network row to display the Edit Network page.Some fields in Edit Network are disabled because configuration of the default network can’t be changed.

- Select the Remote Networks expansion panel and select Add to add a new row to the table. Under Remote Network, select the remote network to connect to by choosing your organization, remote iNode, and the network behind the iNode.

- If the many Edge iNode networks to be connected to the Virtual iNode network will have the same or an overlapping local network CIDR, you’ll need to add a representational network to tell them apart. To do this, under Represent Remote Network Locally as, you specify a representational network CIDR to connect to the Virtual iNode network.

- For each Edge iNode network to connect to, repeat Step 3 and Step 4.

- Select Update to complete connecting the networks. Once they’re connected, the iNode details page shows the connected network details, including name, representational network CIDR (if specified), and connection status.

Connect One Edge iNode Network to Many Virtual iNode Networks
To connect one Edge iNode network to more than one Virtual iNode network, follow these steps:
- From iNodes > All iNodes page, select the name of the Edge iNode to display the iNode details page.

- In the Networks tab, select the name of your local network to display the Edit Network page.

- Select the Remote Networks expansion panel and select Add to add a new row to the table. Under Remote Network, select the remote network to connect to by selecting your organization, remote iNode, and then the network behind the iNode.

- If the many Edge iNode networks to be connected to the Virtual iNode network will have the same or an overlapping local network CIDR, you’ll need to add a representational network to tell them apart. To do this, under Represent Remote Network Locally as, you specify a representational network CIDR to connect to the Edge iNode network.

- For each Virtual iNode network your Edge iNode connects to, repeat Step 3 and Step 4.

- Any traffic from the local network with a destination outside the local or remote network (for example, traffic going to the internet or LAN) is sent to the default destination. You can set the Default Destinationto one of the following:
- None (default), which results in dropping the traffic
- Specify IP Address, which sends the traffic to the IP address of a gateway in the local network that you specify
- WAN Network, which sends the traffic through the iNode uplink
- Select a specific remote network, which sends the traffic to that remote network
- If you want to create static routes for traffic from the local network, see Create static routes for an Edge iNode or a Virtual Edge iNode.
- Select Update to complete connecting the networks.
Once they’re connected, the iNode details page shows the connected network details, including name, representational network CIDR (if specified), and connection status.

Enable Inter Network Routing
In scenarios where devices in different TANs need to communicate, you can enable Inter Network Routing across networks at the Edge iNode. Each Edge iNode network requires one additional free IP address that will be used if you enable this feature.
From the Add Network or Edit Network pages, choose to turn on or off Enable Inter Network Routing.
Once you enable Inter Network Routing for two or more networks, devices in those networks will be able to communicate with each other.
Create Static Routes for an Edge iNode or a Virtual Edge iNode
Create static routes if you want:
- Services running on the Edge iNode or Virtual Edge iNode to reach specific routed network segments behind the iNode
- Hosts in the local network to reach specific networks in your LAN or the internet
- Hosts in the local network to reach specific remote networks behind the Virtual iNode
- Hosts in remote networks behind a Virtual iNode to reach specific routed network segments behind the Edge iNode
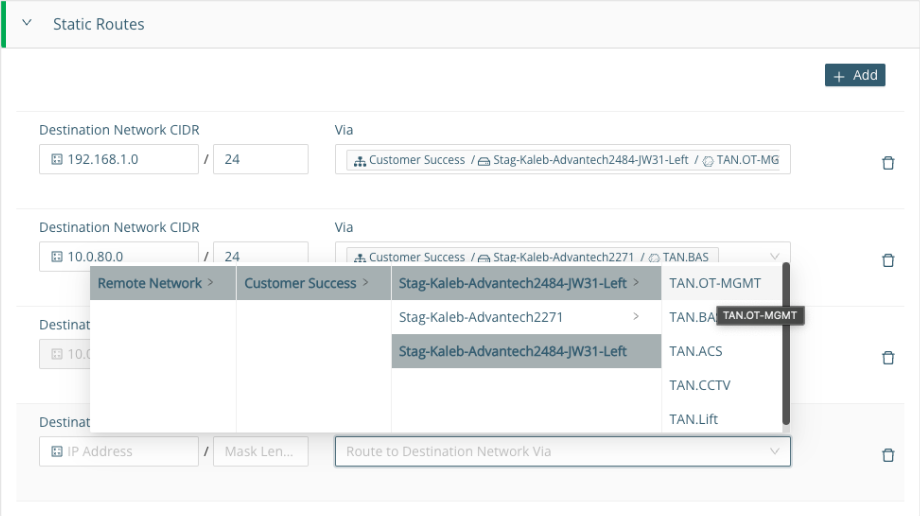
- Select the Static Routes expansion panel and select Add to add a new static route. You can add up to 64 static routes per network. Note that if you set Default Destination to a value other than None, it uses up a static route.

- Specify the CIDR of the destination network in the Destination Network CIDR field.

- Select where to send the traffic going to the destination network in the Via field. Select one of the following:
- Specify IP Address, which sends the traffic to the IP address of a gateway in the local network that you specify
- WAN Network, which sends the traffic through the iNode uplink
- Select a specific remote network, which sends the traffic to that remote network
 If you specify the IP address of a gateway in the local network in Via > Specify IP address, then Allow remote networks becomes available.
- If you want to allow hosts in remote networks behind the Virtual iNode to reach routed network segments behind the Edge iNode through this gateway, select Allow remote networks

- Specify the remote networks allowed to reach the routed network segment in Allow Remote Networks

- If the remote network you’re allowing has a network CIDR that is the same or overlaps that of the destination network, you’ll get an error message that tells you to specify a representational network to distinguish between the conflicting networks.
 To resolve the conflict, specify a representational network for the destination network so that you can tell the conflicting networks apart.
- If you want to make the configured static route available to other networks on the same Edge iNode, you can enable Inter Network Routing. Select the checkbox under Enable Routing for Other Networks.
- Select Update.
Create Static Routes for a Virtual iNode
If you have segmented networks behind the Virtual iNode in your private cloud, you can create static routes to access those networks from the Virtual iNode.
To create a static route on a Virtual iNode:
- Go to the Virtual iNode details page.
- Expand the menu on the “default” network, and select the Edit (pencil) option.

- Expand the Static Routes section and select the +Add button.
- Enter the CIDR for the destination network.
- Select which TAN network should be routed to the destination CIDR.


 If you specify the IP address of a gateway in the local network in Via > Specify IP address, then Allow remote networks becomes available.


 To resolve the conflict, specify a representational network for the destination network so that you can tell the conflicting networks apart.

